Learn how to make a system Install, ink printers Canon PIXMA MG3210, follow the steps below and if you have any questions, type a comment.
Installing an ink system is the ability to save at least 100% or more in the documents we print. The cost per page is the best, the quality is almost the same and the costs for replacement cartridges are very few.
Canon printers make daily changes to the structure of the printers, especially for this technique is not done, the printer manufacturers earn most of their money when consumables (ink cartridges) are purchased.
He then will make a brief explanation of how to install an ink system in the Canon PIXMA MG3210 printer, it uses ink cartridges PG-140 and CL-141 which before the installation must test the operation, print on at least two pages.
If a printer has problems that are manufactured after the installation of a system, we can not claim to the seller, so if about to install a system, you test your computer.
You may be interested in our publishing system components continuous ink
Now put a just click the center of the printer, it will be necessary to bend the clip longer brings the ink system for better long double heatable clip. see image below...
Canon printers make daily changes to the structure of the printers, especially for this technique is not done, the printer manufacturers earn most of their money when consumables (ink cartridges) are purchased.
He then will make a brief explanation of how to install an ink system in the Canon PIXMA MG3210 printer, it uses ink cartridges PG-140 and CL-141 which before the installation must test the operation, print on at least two pages.
If a printer has problems that are manufactured after the installation of a system, we can not claim to the seller, so if about to install a system, you test your computer.
You may be interested in our publishing system components continuous ink
Step No. 1 — Make holes ink cartridges PG-140 and CL-141
Extract the ink cartridges, remove the labels from the top, and the drilling tool to make the four holes in the two cartridges.
We recommend using a wick to iron drills have just as much plugs which are then placed to hold the air in the ink system.
 |
| perforations in the ink cartridges |
Step No. 2 — Place the caps on top of the cartridges
Then the plugs will carry the cartridges on top, if there are no right can put some silicon on the sides.
| canon cartridges with silicon |
Now fill the ink tanks, you must put your elbows are used to adjust the hoses to the cartridge. Look for ways to make the cartridges connected to the hoses without putting them in the printer before.
Step No. 3 — Fill the ink tanks and place your elbows on hoses
You can place the tubes into the cartridge before putting these into the printer, and then an image of the elbows with hoses and tanks filled with ink, do not put a lot of ink to the ink tanks. see image below...
 |
| system hoses canon pixma mg3210 |
Step No. 4 — Connect the cartridges system hoses
As we see in the picture above, the ink system is a bit advanced and inks, to achieve this know where each color in the hoses.
It must be very careful when connecting hoses in the cartridge, avoid connecting these in the wrong, and if so the ink cartridges are damaged place.
 |
| ink cartridges connected to hoses |
Step No. 5 — Remove a little elbow excess of red in the cartridge CL-141
Below we present an image where a key is being phased elbow a little red, like this mistake will not present the color cartridge. If you have a key you can use any other sharp materials or other hot material.
 |
| eliminate some elbow red cartridge Canon CL-141 |
Step No. 6 — Connect the ink cartridges inside the printer and follow the steps below
So far we've made it as easy or at least as fast. From now on, pay close attention to avoid paper jams.
We must use all hose clips you provide the system (when we buy a system that must be completed), use a hose clip to grab on the left side of the cartridge carriage.
Another clip to grab the right hoses at the front of the printer as seen in the image, and the last clip for gripping system hoses out of the printer. (optional) see image below
 |
| put the hoses between the two cartridges |
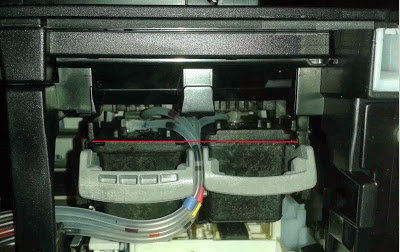
Should put the hoses as is shown in the above image, make sure both cartridges remain at one level, as shown by the red line.
Put the clips to hold the hoses in the cartridge carriage on the left loop of the same. view image
It is recommended to use a double-sided tape resistance in case you can not get a tape that you can trust to use silicon hot. Paste the clip head, do not be possible because the cartridge.
 |
| placing clip cartridge carriage |
 |
| clip in central grip hose printer |
The next step is to bring the hoses out of the printer, on the right side of the printer, it must go through the clip and then the scanner support between the printer and the bottom.
 |
| remove hoses printer canon pixma mg3210 |
Step No. 7 — Remove the front cap for cartridge access
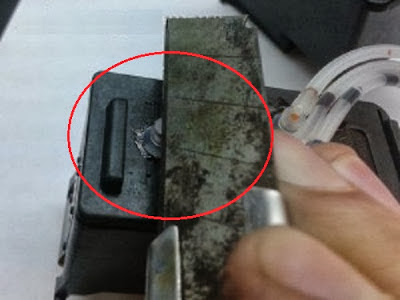
The lid opens when the cartridges must reach the right to remove, identify where sensors that recognize when we put the cartridge and pressure to recognize the cartridges are always positions. (this is optional)
 |
| sensors that indicate when the cover giving access to the cartridges |
Step No. 8 — Make slot for passing printer hose
Below is a picture that will help you create a slot to pass hoses properly without disturbing the printer door and that it can close properly. view image...
 |
| respects the door open indicator door sensor |
Next image will look like the printer and the ink system installed.
 |
| final appearance |
Remember uncover one end of the ink tanks and place the respective filters which brought the system in case of problems with the operation type a comment in this publication will gladly help you.


COMMENTS