Learn to release the head of an Epson printer, follow the steps below and if you have any problems, write a comment.
This publication will help us off the print head of the printer Epson Stylus Photo T50 / Epson Stylus Photo P50 / Epson Artisan 50 Inkjet Printer / Epson Stylus Photo R280 / Epson Stylus Photo R285 / Stylus Photo R290 / Epson Stylus Photo R260 / Epson Stylus Photo R265 / Stylus Photo R270.
Remove a head to the printers I could help uncover easily have the possibility to look carefully that this covering and manage more easily to uncover.
Remove a printer head where we have to take off circuits and manipulate such an important part of the printer is complicated, you should have at least some knowledge to disarm printers.
A screwdriver with an "X" and a screwdriver like pointy head twisted like this instrument is needed. view image...
The printer must be turned off and not connected ink cartridges, the printer can not be connected to the electricity power cord.
Remove a head to the printers I could help uncover easily have the possibility to look carefully that this covering and manage more easily to uncover.
Remove a printer head where we have to take off circuits and manipulate such an important part of the printer is complicated, you should have at least some knowledge to disarm printers.
A screwdriver with an "X" and a screwdriver like pointy head twisted like this instrument is needed. view image...
 |
| pointed tool with twisted head |
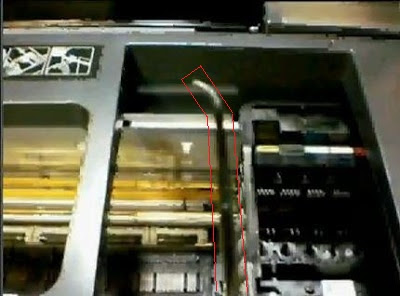
The first thing we do is look in the right into the head end a clip holding the head to the base, we took this to its shaft by loosening the head.
 |
| move clip inside printer head Epson |
The next will move the head circuits, are located on the right side of the head tracery, make this process very carefully and avoid contact of the ink with the connectors.
 |
| move circuit connectors do it carefully |
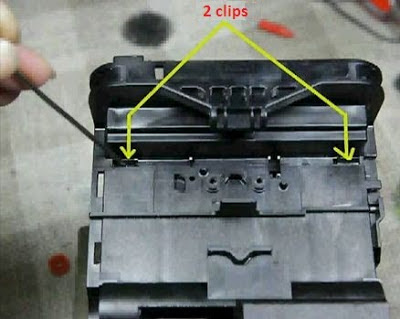
Now we must find a way to move two clips that have the head at the back, they are really difficult because it has no way to access easily but carefully and pointed tool bent be easy, remember not to force the head, you should stop a moment to analyze the situation to find a solution. view image...
 |
| Epson printer head clips |
We get the head connectors, after removing the clip this allows us to move the connectors of the cartridge, do it very carefully and try not to touch the connectors and is made easier recognition of the cartridges.
 |
| remove connectors epson printer head |
Finally with the help of our screwdriver "X" remove four screws located at the bottom of the cartridge, this is the last step to pull the printhead. view image...
 |
| head screws epson printer |
With that we should already have our head in hands, you do whatever you like, try to uncover it, change it for another head, and then put it in the printer, you should do it the same way without losing any detail.


COMMENTS