This tutorial will help you reset the Epson stylus TX135 printer in nine easy steps.
The Epson Stylus TX135 is a multifunction printer, meaning you can copy, scan and print with this printer and the ink cartridges are individual and provide the best quality print.
This is a really compact and good looking equipment you can place anywhere in your house or office. It prints up to 28 ppm in black and 15 ppm in color it can print in the following sizes Letter, Legal (21,6 x 35,6cm), A4, B5, A5, A6, report, executive, statement sizes, user-defined: (8.9 to 21.6 cm) x (8.9 to 111 , 7cm) envelopes: No. 10, DL, C6 and the common, bond types of paper, coated paper, paper with matte finish paper with glossy finish and semi-gloss, self-adhesive and others.
In its input tray can be placed up to 100 pages and 10 envelopes. It is compatible with the Windows® Vista®, XP, XP Professional x64 Mac OS® X, 10.4.11, 10.5.8 - 10.6.x operative systems and uses the following cartridges.
 135 T135120 Epson Black cartridge
 133 Epson Cyan cartridges
 133 Epson Magenta cartridge
 133 Epson Yellow cartridge
Before resetting this Epson printer or any other printer you must take into account that no other printer can be plugged to the same computer, regardless to their brand, this printer and the computer must be fully working and plugged.
Purchase here with PayPal.-
Updated: link to download the resetting program...
This is a really compact and good looking equipment you can place anywhere in your house or office. It prints up to 28 ppm in black and 15 ppm in color it can print in the following sizes Letter, Legal (21,6 x 35,6cm), A4, B5, A5, A6, report, executive, statement sizes, user-defined: (8.9 to 21.6 cm) x (8.9 to 111 , 7cm) envelopes: No. 10, DL, C6 and the common, bond types of paper, coated paper, paper with matte finish paper with glossy finish and semi-gloss, self-adhesive and others.
In its input tray can be placed up to 100 pages and 10 envelopes. It is compatible with the Windows® Vista®, XP, XP Professional x64 Mac OS® X, 10.4.11, 10.5.8 - 10.6.x operative systems and uses the following cartridges.
 135 T135120 Epson Black cartridge
 133 Epson Cyan cartridges
 133 Epson Magenta cartridge
 133 Epson Yellow cartridge
Before resetting this Epson printer or any other printer you must take into account that no other printer can be plugged to the same computer, regardless to their brand, this printer and the computer must be fully working and plugged.
Purchase here with PayPal.-
Updated: link to download the resetting program...
 |
| Epson stylus tx135 printer reset |
Step No. 1
This document is hosted on Google Drive, in case you do not know how to download this file see our guide manual on how to download it, see it carefully...
How to download a file from Google Drive:
When we get in the document in Google drive what we have to do is go to “File”. Located on the top left of your screen.
 |
| file in Google Drive |
After clicking on the file, move down and click on download it is the third to the last option in the file menu. see the following image...
 |
| click to download file |
Step No. 2
When the file is downloaded you will see it is a zip package, it has to be unzipped and to do so it is recommended to use WinRAR, to know how to unzip see the following manual on how to unzip a document. see image...
 |
| click on download file |
Step No. 3
After unzipping the file double click on the file with the following image. What you need is to run this file and it can be done by right-clicking twice on it and run it.
Step No. 4
A message will be displayed indicating that this program is for free and then click on Accept.
Step No. 5
In the next step what you have to select is the option Select which is located in the top right of the screen. see image...
 |
| click on select |
Step No. 6
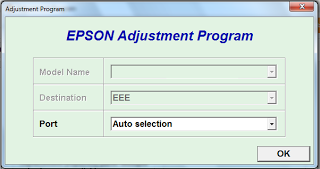
Then a window will be displayed allowing you to select the port the printer is plugged to, chose the Auto Select option and click on OK. see the following image…
 |
| leave the port in Auto Select |
Step No. 7
In Model Name the name of the reset you are trying to install will be shown since the "Destination" part won’t be modified and in Port leave the default option, in this case, is "Auto Select" see image above, in case of questions, leave a comment.
After clicking on OK, the window where you select Auto Select will disappear, and the main program window will remain, in this window select Particular Adjustment Mode option. see image...
 |
| particular adjustment mode |
Step No. 8
In this step you have to be really careful, any other options chosen by mistake can be fatal for you printer, so much so that it can delete the printer settings forever, it is recommended to select just the option we will tell.
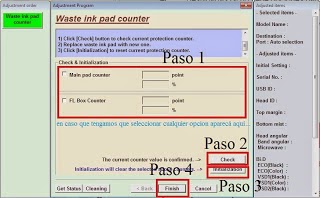
The option you have to select is called Waste Ink Pad Counter and then click on OK to continue.
This will restore the printer and indicate that there is no ink waste, although doing this procedure you must be aware that the ink waste is full, though perhaps the printer gets to indicate this due to the number of pages printed, the truth is that it can cause damages over time.
 |
| just click waste ink pad counter |
After selecting this option click on OK
Step No. 9
Now choose all the options display to select, afterward click on CHECK, to verify that everything is all right, click on ACCEPT, then click on INITIALIZATION and when the process is finished click on FINISH.
At the end of all this process turn off the printer, wait for about 30 seconds and turn it on again, this way the pages counter that was telling you the ink waste was full is now reset. see image...
 |
| procedure read the first information before |
In case the results obtained in this post are not what you expected, contact us by leaving a comment and we will gladly answer. see important information next...
It is important for you to download the printer drivers for Windows XP/Vista/7, get this printer user manual for free, (HTML) with this one you will be able to read well the factory specifications of the printer.


COMMENTS