Learn how to make copies in your Canon mp series printers in just a few simple steps.
Working with a Canon mp series printers give you plenty of copying options, for example, you can perform regular A4 copies up to high-resolution photographic copies, and you can also enlarge or reduce a version of original documents.
4" x 6"/10 x 15 cm; 4" x 8"/101,6 x 203,2 mm; 5" x 7"/13 x 18 cm o 2,16" x 3,58"/55,0 x 91,0.
You must organize the sheets before loading them on the printer, for which we recommend aligning the margins of the paper tray to be able to introduce them properly. Now please look at the next picture.
Before you begin, you must make sure the paper tray is loaded with a few pages. This main paper tray is located on the top of the printer.
Once the process is finished, remember to remove all the pages from the tray and close the access gate, to avoid any dirt inside this area susceptible of causing a paper jams error or damaging the printer. Click here to read our post regarding paper jams in canon printers.
The next image will show you where to place the blank pages you’re going to use in order to copy the original document of your choosing.
You must be very aware of the placement of the sheet on the scanner’s crystal to perform the actual scan. The next picture will show you how to properly do this.
Normal or A4 copies:
This printer will take any of the following paper sizes:4" x 6"/10 x 15 cm; 4" x 8"/101,6 x 203,2 mm; 5" x 7"/13 x 18 cm o 2,16" x 3,58"/55,0 x 91,0.
You must organize the sheets before loading them on the printer, for which we recommend aligning the margins of the paper tray to be able to introduce them properly. Now please look at the next picture.
 |
| Organizing papers |
Once the process is finished, remember to remove all the pages from the tray and close the access gate, to avoid any dirt inside this area susceptible of causing a paper jams error or damaging the printer. Click here to read our post regarding paper jams in canon printers.
The next image will show you where to place the blank pages you’re going to use in order to copy the original document of your choosing.
 |
| pages process |
You should also know that scanners usually have a small picture engraved on the plastic that surrounds the crystal that indicates the exact position the pages must be put in. The next picture will show you where to find it.
 |
| The correct position of the document |
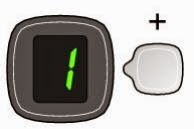
Once you lowered the lid and close the scanner, the next thing you must do is select how many copies you want to make. You will have to use the main screen on your Canon printer for this considering almost all Canon mp series printers have one installed on the top. Now select the number of pages you want to use the (+) key on it. You can make up to 20 copies of the same document using this printer. Now please pay attention to the next picture.
 |
| select the number of copies |
If you press the + button the number of pages will increase. The (f) symbol will appear on screen after you have reached 20 copies-. If you wish to return to 1, please push the + once more.
We recommend putting only the number of pages you need to use in your printer.
If you wish to change the size of the copies, you must press the paper button. It will display all the types of paper the printer can copy. The page sizes you can choose from are the following:
1. Regular A4 u 8,5" x 11"
2. Photographic A4 paper u 8,5" x 11"
3. Photographic paper 10 x 15 cm o 4" x 6"
For example, if you select the A4 size on this menu but use a photographic paper sheet to copy a document, then the final copy will have the size of the photographic sheet instead of the A4 one.
Important note: do not lift the cover of the scanner or remove the original document while the printer’s still copying. This will distort the information and make the copies look bad.
If you want to make color copies:
You can make all-black copies by selecting the black-and-white or color buttons located on the printer’s main panel. Now please look at the following picture.
 |
| color buttons |
The #9 button will allow you to make black-and-white copies with your printer, while the #8 one is related to color copies and the #7 is in charge of restoring.
This last button is used to restore the printer if you have refilled your ink cartridges and it doesn’t recognize them anymore. To learn more about restoring your Canon printer, please visit the following post. If you need more information about this post, please post a comment in the section below.


COMMENTS